
If you’re looking for a simple, creamy, and decadent dessert that never fails to impress, this Easy Peanut Butter Pie is exactly what you need. With a smooth peanut butter filling set inside a chocolate cookie crust, this no-bake pie requires minimal effort and delivers an unforgettable dessert experience. It’s the perfect treat for family gatherings, potlucks, celebrations, or those moments when you just need a rich, indulgent dessert without turning on the oven.
This recipe uses everyday ingredients and comes together in under 20 minutes of prep time. With its silky texture, balanced sweetness, and irresistible peanut butter flavor, this pie tastes like something you would expect to find at a bakery, yet it’s incredibly easy to make at home. Whether you are new to baking or an experienced home cook, this dessert is guaranteed to earn rave reviews.
Why You’ll Love This Recipe
This Easy Peanut Butter Pie has all the qualities of a top-rated no-bake dessert. Here are the top reasons it belongs in your recipe collection:
- Requires absolutely no baking, making it a perfect year-round dessert.
- Quick and simple preparation, ideal for busy families and beginner cooks.
- Budget-friendly and uses common pantry ingredients.
- Make-ahead friendly, great for meal prep desserts or holiday planning.
- Tastes like a gourmet dessert with minimal effort.
- Easily customizable with flavor variations and toppings.
If you love easy dessert recipes, this pie will quickly become a household favorite and a go-to treat for parties, birthdays, special occasions, or weeknight indulgence.
Ingredient Breakdown
Here’s a closer look at what you’ll need and why each ingredient matters in creating the perfect peanut butter pie:
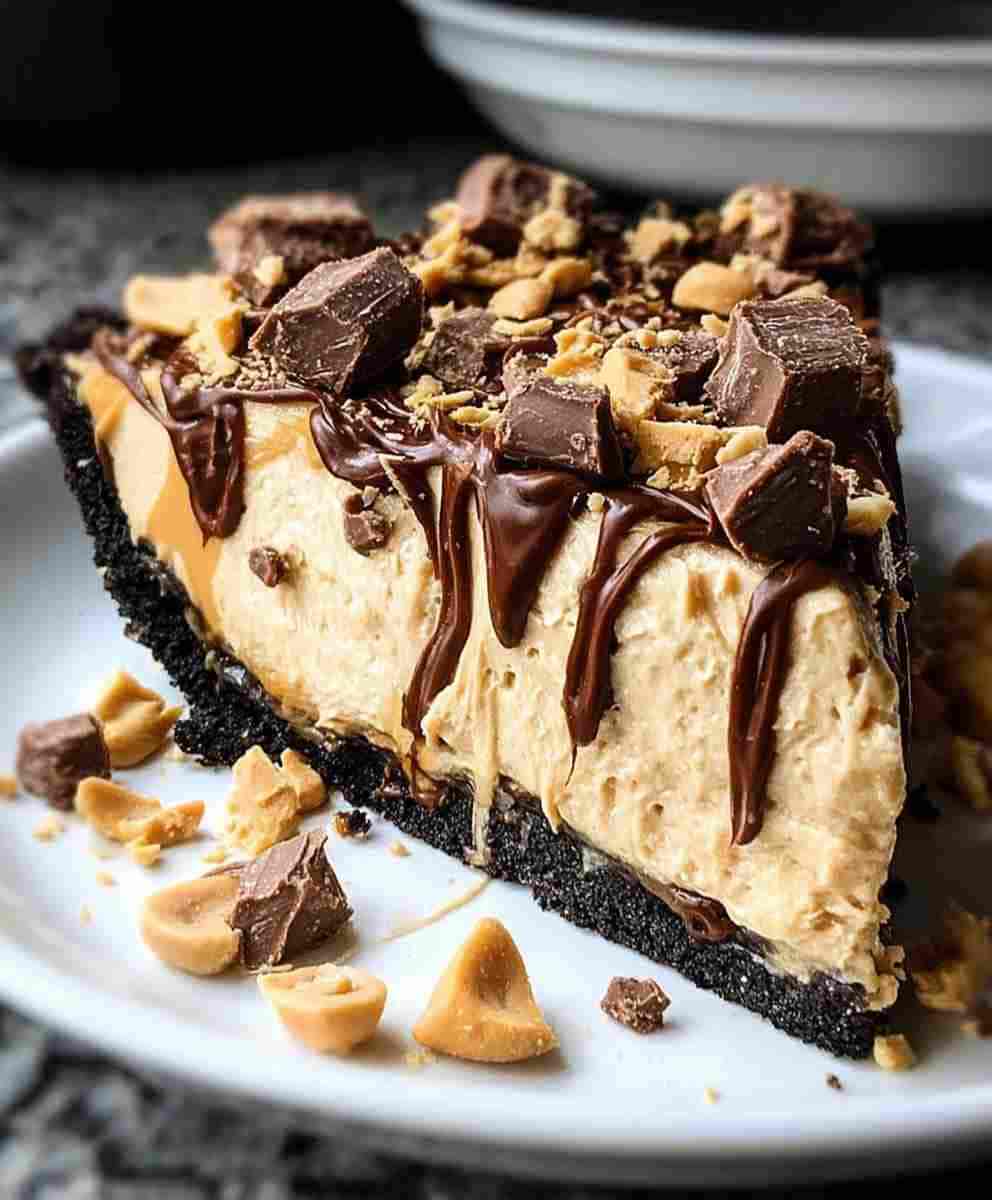
Oreos (24 cookies):
These form the base of the crust. When crushed and mixed with butter, they create a rich, chocolatey foundation that complements the peanut butter filling beautifully. You can use regular or double-stuffed Oreos depending on how sweet you want the crust.
Unsalted Butter (5 tablespoons):
Binding the crushed Oreos together, butter helps create a firm crust that sets well in the fridge. Use unsalted butter to control the overall sweetness.
Whipping Cream (1 cup):
Whipped to stiff peaks, the cream gives the filling its light, airy texture. It prevents the pie from feeling too heavy or dense while adding richness.
Powdered Sugar (2 tablespoons + ½ cup):
Powdered sugar fully dissolves into the filling without graininess. It sweetens both the whipped cream and the peanut butter mixture for balanced flavor.
Cream Cheese (8 ounces, softened):
This provides structure and slight tang, balancing the sweetness of the peanut butter and giving the filling its silky, cheesecake-like consistency.
Creamy Peanut Butter (½ cup):
The star ingredient. Use creamy peanut butter for the smoothest texture. Natural peanut butter can be used but may require slight adjustments for consistency.
Vanilla Extract (1 teaspoon):
Enhances flavor and depth. Even a small amount elevates the filling noticeably.
Chopped Peanuts (for topping):
Adds crunch and texture contrast, enhancing presentation and flavor.
Chocolate Syrup or Chocolate Shavings (optional):
For an added layer of decadence. A drizzle of chocolate syrup or sprinkle of chocolate pieces makes the pie look bakery-worthy.

Pro Tips for Success
Even though this dessert is incredibly easy, a few expert kitchen tricks can make it taste even better.
- Use full-fat cream cheese for the creamiest texture.
Lower-fat varieties may lead to a thinner or less stable filling. - Chill the bowl before whipping cream.
Cold equipment helps the cream whip faster and hold its shape longer. - Fold gently, do not stir.
Folding the whipped cream into the peanut butter mixture keeps the filling light and airy. Over-mixing deflates it. - Refrigerate for at least 4 hours before serving.
This allows the filling to firm up and slice cleanly. - Crush Oreos finely for a firmer crust.
You can use a food processor or place them in a sealed bag and crush with a rolling pin.
These small steps ensure your no-bake pie turns out perfect every time.
Ingredient Swaps and Variations
This pie is easy to customize, and small tweaks can transform it into a new dessert version. Here are a few ideas:
Gluten-Free Version:
Use gluten-free chocolate sandwich cookies to make the crust.
Low-Sugar or Healthier Option:
Swap regular peanut butter with a no-sugar-added variety and reduce the powdered sugar by one-third. Use light cream cheese and sugar-free whipped topping if preferred.
Different Crust Options:
Try a graham cracker crust, chocolate graham crackers, or a pretzel crust for salty-sweet contrast.
Chocolate Lovers Edition:
Add chocolate chips to the filling or spread melted chocolate over the crust before adding the filling.
Nut Alternatives:
If peanut allergies are a concern, swap peanut butter for almond butter, cashew butter, or sunflower seed butter.
These options make it easy to fit dietary needs or flavor preferences while still enjoying a delicious homemade dessert.
Serving Suggestions
This pie is delicious on its own, but the right pairings or toppings can make the experience even more memorable.
- Serve chilled with hot coffee, cappuccino, or iced latte.
- Add freshly whipped cream or vanilla ice cream on the side.
- Drizzle with caramel or chocolate sauce before serving.
- Top with chopped peanut butter cups for a richer flavor.
- For gatherings, slice into smaller squares and serve as mini dessert portions.
Perfect for summer barbecues, holidays, office parties, or as a refreshing after-dinner dessert.
Make-Ahead and Storage Tips
This Easy Peanut Butter Pie is ideal for planning ahead, especially for holidays or events.
Make Ahead:
Prepare the pie the night before and refrigerate. This enhances the texture and flavors.
Refrigeration:
Store tightly covered for up to 5 days. Keep it cold for the best texture.
Freezing:
Yes, this pie freezes well. Freeze whole or in slices for up to 2 months. Thaw in the refrigerator overnight before serving.
Transporting the Pie:
If taking to a party, freeze for one hour before leaving so it stays firm during travel.
These simple storage tips make this a reliable dessert for entertaining and meal prep.
A Note on Origin
No-bake pies like this gained popularity in the mid-20th century when home cooks sought fast and easy desserts that required less oven time, especially during warm months. Peanut butter pie quickly became a staple in American homes due to its comforting flavor, simple preparation, and family-friendly appeal. Today, it remains a classic dessert, often appearing at potlucks, holiday dinners, birthdays, and church gatherings.
Frequently Asked Questions
Can I make this pie ahead of time?
Yes. It is best made at least 4 hours in advance or overnight to allow it to set properly.
Why is my filling too soft?
The cream may have been under-whipped or over-mixed. Ensure stiff peaks before folding and refrigerate for several hours before slicing.
Can I use natural peanut butter?
Yes, but you may need to adjust the powdered sugar slightly or add 1 to 2 tablespoons more to help stabilize the filling.
Can I freeze peanut butter pie?
Absolutely. Freeze for up to 2 months. Thaw slowly in the refrigerator before serving.
What toppings work well?
Chopped peanuts, mini peanut butter cups, chocolate shavings, caramel, or a drizzle of syrup all complement the pie beautifully.
Easy Peanut Butter Pie
Ingredients
Equipment
Method
- Crush the Oreos finely using a food processor or rolling pin. Mix with melted butter until fully combined.
- Press the mixture firmly into a greased pie plate to form the crust. Refrigerate for 30 minutes.
- In a mixing bowl, whip the cream with 2 tablespoons powdered sugar until stiff peaks form. Set aside.
- In another bowl, beat softened cream cheese until smooth, then add peanut butter, remaining powdered sugar, and vanilla extract. Mix until fully combined.
- Gently fold the whipped cream into the peanut butter mixture until no streaks remain.
- Spoon the filling into the chilled crust.
- Top with chopped peanuts, chocolate pieces, or a drizzle of chocolate syrup if desired.
- Refrigerate until firm, at least 4 hours or overnight for best results.


