
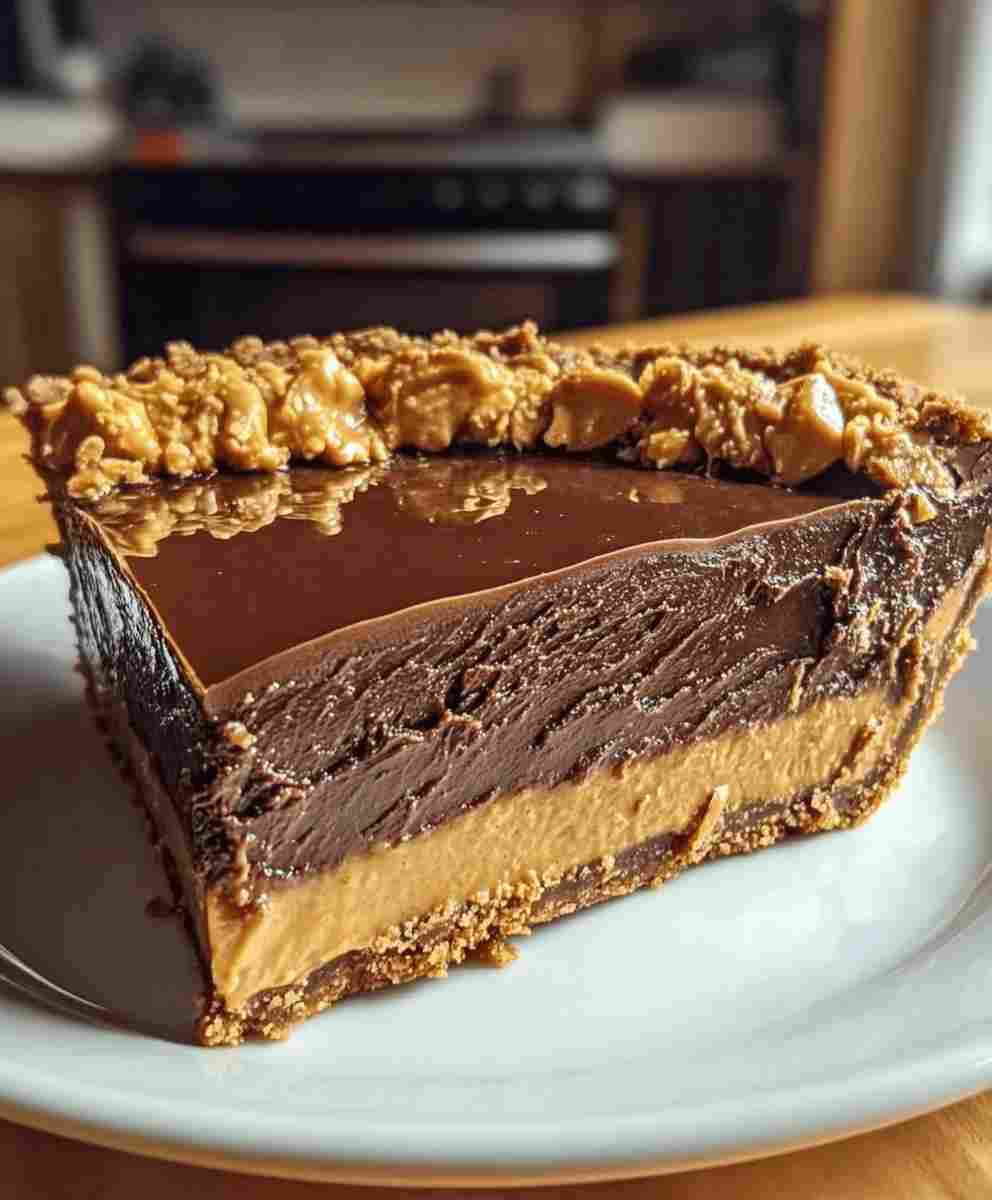
If you love rich, creamy desserts that don’t require turning on the oven, this No-Bake Chocolate Peanut Butter Pie is about to become your new go-to. With a buttery graham cracker crust, a fluffy peanut butter filling, and a silky chocolate topping, this dessert tastes like a giant peanut butter cup in pie form.
This recipe is perfect for anyone looking for easy dessert recipes, whether you’re planning a party, making a weeknight treat, or simply craving something indulgent without spending hours in the kitchen. It’s budget-friendly, beginner-friendly, and a guaranteed hit with both kids and adults.
The best part? It takes just a few minutes to assemble, then the fridge does the rest. Whether you call it family comfort food or a quick make-ahead dessert, one thing is certain: this pie will disappear fast.
Why You’ll Love This Recipe
- No Baking Required – Ideal for hot days when you don’t want to heat the oven.
- Easy & Quick – Just a few simple steps and minimal ingredients.
- Budget-Friendly Dessert – Uses common pantry staples like peanut butter, chocolate chips, and graham crackers.
- Family Comfort Food – A nostalgic dessert that tastes like a Reese’s cup.
- Perfect for Entertaining – Elegant enough for holidays, simple enough for weeknights.
- Make-Ahead Dessert – Chill overnight and serve stress-free at your next gathering.
Ingredient Breakdown
Let’s look at what makes this pie so irresistible:
- Graham Cracker Crumbs (1 ½ cups) – The classic pie crust base. Sweet, crunchy, and perfect for no-bake recipes. Use gluten-free graham crackers if needed.
- Unsalted Butter, Melted (½ cup) – Binds the crumbs together, creating a sturdy crust.
- Creamy Peanut Butter (1 cup) – The star ingredient! Smooth, rich, and full of nutty flavor.
- Powdered Sugar (1 cup) – Sweetens the peanut butter filling while keeping it smooth.
- Heavy Whipping Cream (1 cup) – Whipped to stiff peaks, it adds lightness and turns the filling into a mousse-like texture.
- Chocolate Chips (1 cup) – Melted for the glossy chocolate topping. Semi-sweet works best, but milk or dark chocolate can be used.
- Milk (2 tbsp) – Helps melt and smooth the chocolate topping for easy spreading.

Pro Tips for Success
- Chill the Crust First – Refrigerate the crust for 10–15 minutes before adding the filling to help it set.
- Use Cold Cream – For best whipping results, keep cream and mixing bowls very cold.
- Don’t Overmix the Filling – Gently fold the whipped cream into the peanut butter mixture to keep it airy.
- Slice with a Warm Knife – Dip the knife in hot water before cutting for clean, neat slices.
- Top Just Before Serving – Add garnishes like whipped cream, chocolate shavings, or peanut butter cups right before serving.
Ingredient Swaps & Variations
- Gluten-Free Dessert – Use gluten-free graham crackers for the crust.
- Sugar-Free Version – Swap powdered sugar for powdered monk fruit sweetener and use sugar-free chocolate chips.
- Nut-Free Option – Substitute sunflower seed butter for peanut butter.
- Extra Crunch – Add chopped peanuts or pretzels to the crust for texture.
- Layered Pie – Alternate peanut butter filling and chocolate layers for a fancy presentation.
Serving Suggestions
- Classic Presentation – Top with whipped cream, chocolate curls, or peanut butter drizzle.
- Holiday Dessert Table – Perfect alongside cheesecakes, pies, or cookies.
- Party Food Idea – Slice into small bars for easy finger food.
- With Coffee or Milk – This rich pie pairs beautifully with a hot or cold beverage.
- Frozen Treat – Chill overnight, then freeze for a firmer, ice-cream-like pie.
Make Ahead + Storage Tips
- Make Ahead – Prepare the pie a day in advance and refrigerate until ready to serve.
- Refrigeration – Store covered in the fridge for up to 4 days.
- Freezer-Friendly – Wrap tightly in plastic and foil, and freeze up to 2 months. Thaw overnight in the fridge before serving.
- Meal Prep Idea – Make mini pies in jars or muffin tins for individual servings.
- Leftover Hack – Crumble pie into parfait glasses with whipped cream for a quick trifle.
Cultural or Historical Notes
No-bake pies became popular in mid-20th century America when home cooks sought easy dessert recipes that didn’t require extensive cooking. Peanut butter pies, in particular, grew in popularity across the Southern U.S., where creamy, indulgent, family comfort food desserts are a staple. This modern version combines the classic flavors of peanut butter and chocolate in a simple, elegant pie that appeals to every generation.
Frequently Asked Questions (FAQ)
1. Can I make this pie ahead of time?
Yes, it’s best made ahead since it needs to chill for at least 4 hours or overnight.
2. What’s the best way to store leftovers?
Keep covered in the refrigerator for up to 4 days, or freeze for longer storage.
3. Can I make this pie healthier?
Yes! Use natural peanut butter, sugar-free chocolate, and a low-calorie sweetener instead of powdered sugar.
4. What substitutions work for allergies?
For nut allergies, swap in sunflower seed butter. For gluten-free, use gluten-free graham crackers.
5. Can I make this into mini pies?
Absolutely! Use muffin tins, ramekins, or jars for individual servings—perfect for parties or meal prep.
No-Bake Chocolate Peanut Butter Pie
Ingredients
Equipment
Method
- In a bowl, mix graham cracker crumbs and melted butter until combined.
- Press the crumb mixture into a pie pan to form the crust.
- In another bowl, combine peanut butter and powdered sugar until smooth.
- In a separate bowl, whip the heavy cream until stiff peaks form.
- Fold the whipped cream into the peanut butter mixture until light and fluffy.
- Spread the peanut butter filling evenly into the prepared crust.
- Melt chocolate chips with milk until smooth and pour over the filling.
- Chill in the refrigerator for at least 4 hours before serving.


