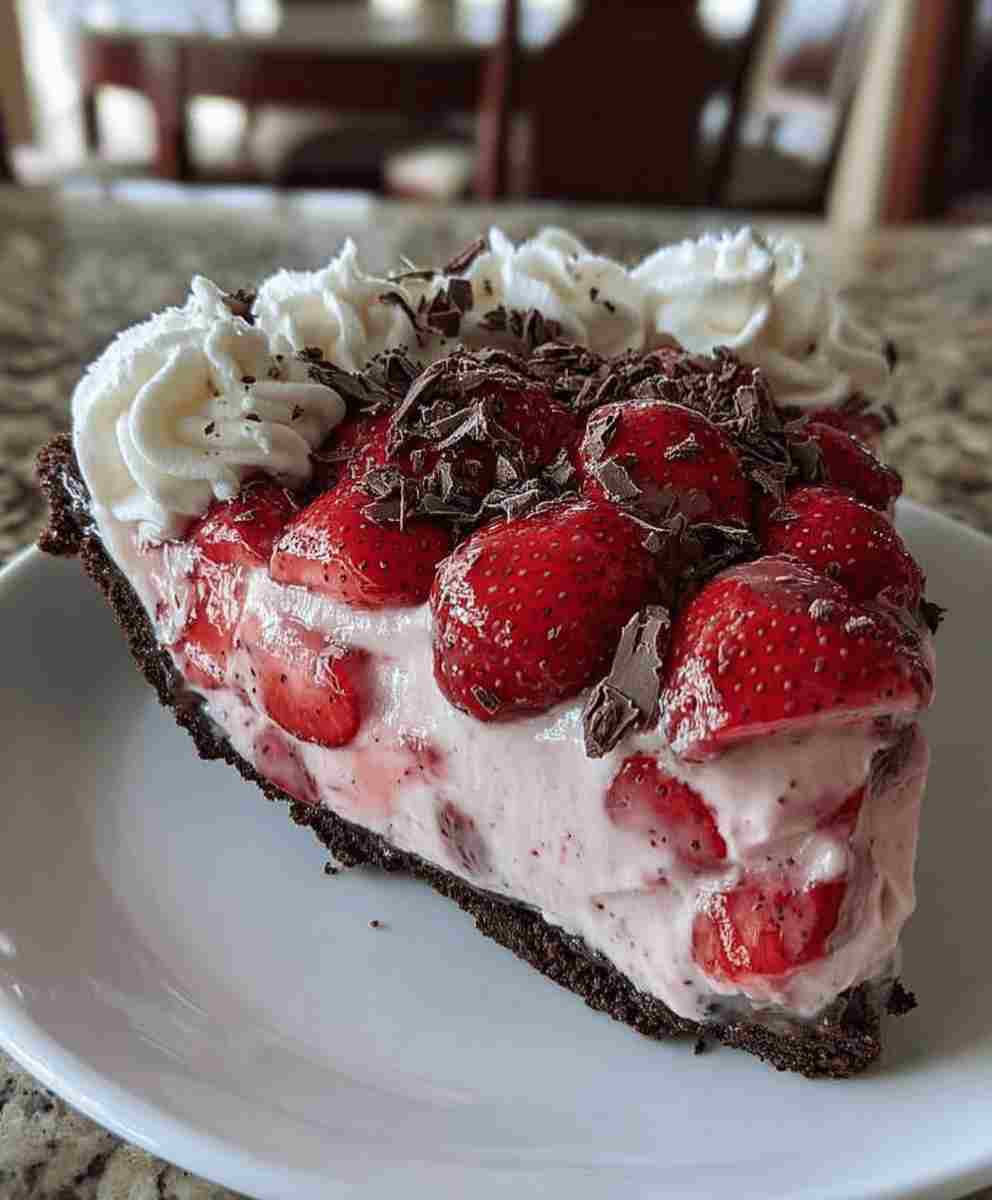
If you’re searching for the ultimate Chocolate Covered Strawberry Pie, this is the easy dessert recipe you’ll make again and again. It’s rich, creamy, chocolatey, fruity, and completely irresistible. The best part? It’s a no-bake homemade dessert that looks fancy but requires very little effort.
Picture this: a crunchy chocolate cookie crust, topped with a glossy layer of silky hot fudge, then finished with a fluffy strawberry cream filling that tastes like cheesecake and whipped cream had a perfect strawberry-flavored baby. Every bite melts smoothly, with bursts of berry sweetness balanced by deep chocolate richness.
This Chocolate Covered Strawberry Pie is ideal for chocolate lovers, busy home bakers, and anyone who wants a quick dessert that impresses without complicated steps. It uses simple ingredients, requires zero oven time, and delivers bakery-style results. Whether it’s Valentine’s Day, a birthday, or just a random Tuesday craving, this pie belongs on your table.
If you love easy dessert recipes, simple homemade baking, and crowd-pleasing sweets, keep reading. This recipe checks every box.
Why You’ll Love This Chocolate Covered Strawberry Pie
There are plenty of dessert ideas out there, but this one stands out for all the right reasons.
- It’s completely beginner-friendly and foolproof
- A true no-fail recipe with simple prep
- No oven required, making it perfect year-round
- Made with affordable baking ingredients
- A guaranteed crowd-pleaser for parties
- Perfect make-ahead dessert option
- One of the best chocolate lover desserts
This pie combines everything you want in an easy dessert: texture, flavor contrast, visual appeal, and convenience. It’s sweet but balanced, rich but not heavy, and impressive without being complicated.
About the Ingredients
The magic of this Chocolate Covered Strawberry Pie comes from everyday ingredients working together beautifully.
Chocolate sandwich cookies create the rich, crunchy crust. Once crushed and mixed with butter, they form a sturdy base with deep chocolate flavor. Store brands work perfectly, making this an affordable dessert option.
Unsalted butter binds the crust together and adds richness. Melted butter ensures even distribution and helps the crust hold its shape after chilling.
Hot fudge sauce provides the decadent chocolate layer that truly makes this pie taste like chocolate-covered strawberries in dessert form. Heating it slightly helps it spread smoothly across the crust.
Strawberry pie filling brings vibrant flavor, sweetness, and beautiful color. It adds real strawberry texture and ensures consistent results every time.
Cream cheese gives structure and a slight tang, preventing the filling from being overly sweet. It balances the chocolate and strawberry flavors perfectly.
Powdered sugar sweetens the filling smoothly without graininess, blending seamlessly into the cream cheese.
Vanilla extract enhances the whipped cream and rounds out the flavors.
Heavy cream whips into soft peaks, creating a light, airy texture that makes the filling fluffy instead of dense. You can substitute whipped topping for convenience.
Garnishes like fresh strawberries, shaved chocolate, and whipped cream elevate the presentation and flavor, turning a simple homemade dessert into something truly stunning.
Tips & Tricks
For dessert success, make sure your cookie crumbs are finely crushed. Large chunks can cause the crust to crumble when slicing. Use the bottom of a measuring cup to press the crust firmly and evenly.
Heat the hot fudge only until pourable. If it’s too hot, it may soften the crust excessively. Let it cool slightly before spreading.
Chill time is crucial. Refrigerating for at least six hours allows the layers to fully set. Skipping this step may result in messy slices.
Always whip the heavy cream until stiff peaks form. This baking tip ensures your filling holds its shape and stays fluffy.
If using a springform pan, release the sides gently after chilling for clean edges and professional-looking slices.
Pro Tips
- Chill your mixing bowl and beaters before whipping cream for faster, better peaks.
- Use full-fat cream cheese for the creamiest texture and best flavor.
- Slice the pie before adding garnishes to keep presentation neat.
- Let the pie sit at room temperature for 5–10 minutes before serving for easier cutting.
- Add a drizzle of melted chocolate on top for an extra bakery-style finish.
These small details transform a good dessert into one of the best dessert ideas you’ll ever serve.
Step-by-Step Instructions
- Place chocolate sandwich cookies in a food processor and pulse until fine crumbs form. Combine with melted butter and mix thoroughly.
- Press the crumb mixture firmly into the bottom of a 9-inch springform pan or pie dish. Chill for 10–15 minutes.
- Heat the hot fudge sauce until pourable and spread evenly over the crust. Refrigerate for 30 minutes.
- In a mixing bowl, whip cold heavy cream with vanilla extract until stiff peaks form.
- In a separate bowl, beat softened cream cheese with powdered sugar until smooth and creamy.
- Gently fold the whipped cream into the cream cheese mixture until combined.
- Fold in the strawberry pie filling carefully to maintain a light texture.
- Spread the filling evenly over the chilled fudge layer.
- Refrigerate for at least six hours or overnight for best dessert preparation results.
- Slice and garnish with whipped cream, fresh strawberries, and shaved chocolate before serving.
This easy step-by-step recipe ensures perfect results every time.
Variations
There are so many ways to customize this Chocolate Covered Strawberry Pie.
Use gluten-free chocolate cookies to create a gluten-free dessert option.
Swap strawberry filling for cherry, raspberry, or mixed berry to create new recipe variations.
Add mini chocolate chips to the filling for extra texture.
Use dark chocolate fudge instead of milk chocolate for deeper flavor.
For a lighter version, substitute reduced-fat cream cheese and light whipped topping for a lower-calorie alternative.
These easy dessert twists keep the recipe exciting while maintaining its signature flavor.
How to Store Chocolate Covered Strawberry Pie
Store leftover Chocolate Covered Strawberry Pie in the refrigerator, tightly covered, for up to four days. This helps maintain texture and freshness.
For freezer-friendly desserts, wrap individual slices in plastic wrap and place them in an airtight container. Freeze for up to two months. Thaw overnight in the refrigerator before serving.
Avoid adding fresh garnishes before freezing. Add toppings after thawing for best results.
This pie also works beautifully as a make-ahead dessert. Prepare it up to 24 hours in advance and keep refrigerated until ready to serve.
Frequently Asked Questions
Can I make Chocolate Covered Strawberry Pie ahead of time?
Yes, it’s one of the best make-ahead desserts. Prepare it the day before serving and refrigerate overnight.
How do I store leftovers?
Store covered in the refrigerator for up to four days. For longer storage, freeze slices individually.
Can I make this recipe healthier?
You can use light cream cheese and reduced-fat whipped topping to reduce calories while maintaining flavor.
Can I use homemade strawberry filling?
Absolutely. Homemade filling works beautifully and adds a fresher taste.
Can I use a store-bought crust?
Yes, a prepared chocolate crust makes this recipe even quicker and still delicious.
This Chocolate Covered Strawberry Pie truly delivers everything you want in an easy dessert recipe: rich chocolate, sweet strawberries, creamy texture, and stunning presentation. It’s simple homemade baking at its best — a guaranteed crowd-pleasing sweet that belongs in your regular dessert rotation.
Chocolate Covered Strawberry Pie
Ingredients
Equipment
Method
- In a heatproof bowl, melt chocolate with ½ cup cream (using microwave or double boiler) until smooth. Stir in vanilla. Pour into crust and spread evenly. Chill 10 minutes.
- Arrange halved strawberries cut-side down over the chocolate layer, covering the pie.
- Beat 1 cup cream, powdered sugar, and vanilla until stiff peaks form. Spread or pipe over the strawberries.
- Drizzle with extra melted chocolate or sprinkle with chocolate curls.
- Refrigerate 1–2 hours before slicing to let everything set.