
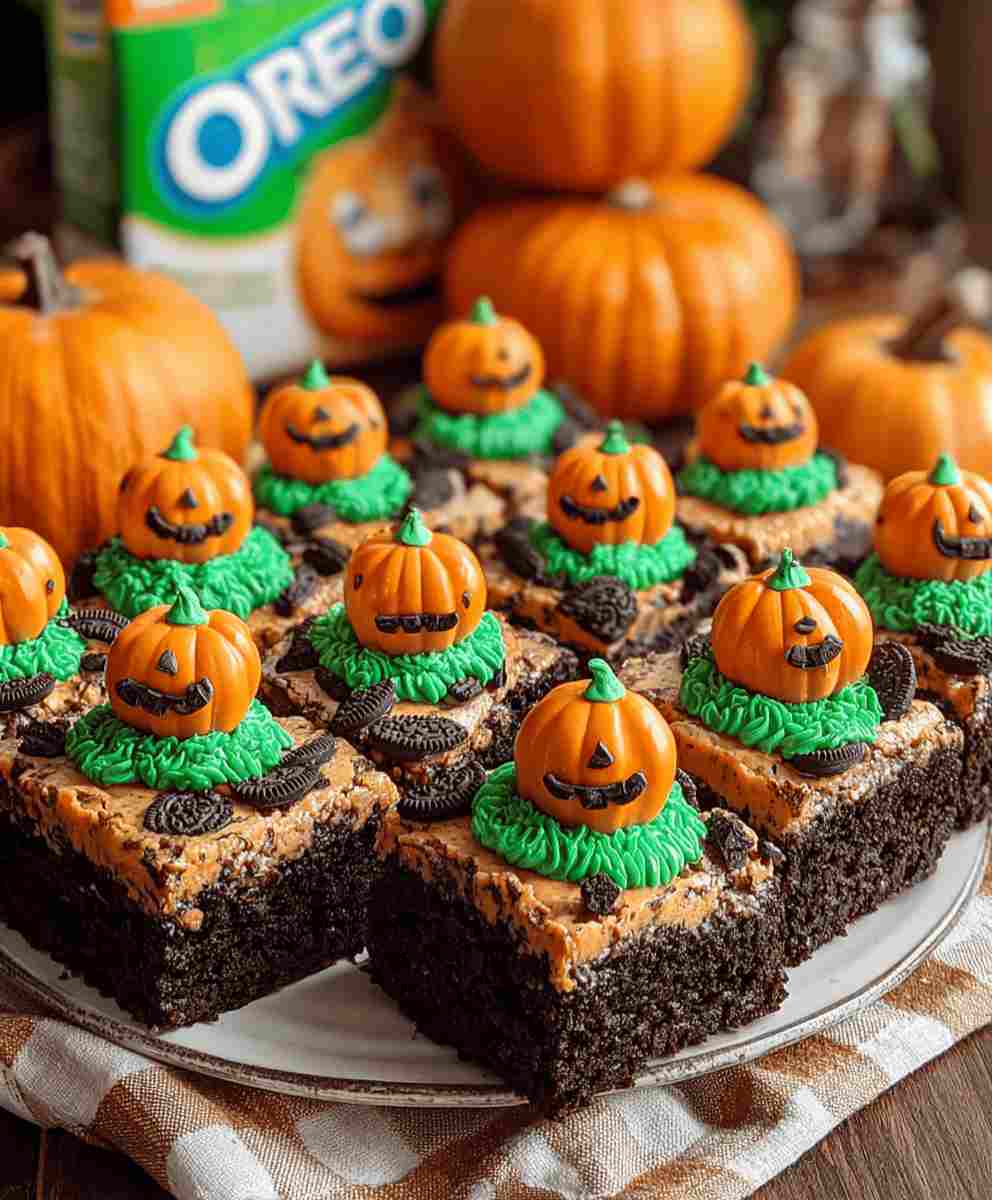
Looking for an irresistible easy dinner idea that turns into a budget-friendly dessert? This fun and festive treat delivers rich, fudgy chocolate layers topped with a whimsical candy-pumpkin patch scene—perfect for simple family recipes and fun gatherings. The chewy brownies melt in your mouth, the Oreo crumb “dirt” adds a crunch, and the bright orange pumpkins and piped green vines bring out cheerful color and texture. Whether you’re prepping for a cozy night in or planning quick weeknight recipes with a creative twist, this playful bake brings comfort, charm and about five minutes of extra décor magic.
Picture slicing into warm chocolate squares, the crumbly top giving way to a moist middle, each nestled under a candy pumpkin that looks like it was just plucked from the patch. The flavors and textures make this more than just a dessert—it’s a conversation piece, an easy entertaining win, and a way to involve the kids in the kitchen. Let’s dive in.
Why You’ll Love This Recipe
- Fast prep + fun finish – With a boxed mix or homemade base, it’s one of the most easy dinner recipes you’ll ever turn into dessert magic.
- Budget-friendly meal and dessert fusion – Using pantry staples plus seasonal candy, this is a budget-friendly recipe you can pull off without breaking the bank.
- Kid-approved, family comfort food – The combination of brownies, crumbled cookies and candy pumpkins makes this a sure hit for a family comfort food experience.
- Perfect for meal prep or party trays – Bake once, slice into squares, and you’ve got meal prep recipes for dessert, school snacks or a holiday gathering.
- Creative and customizable – A great blank canvas to add your own twist: try healthy recipe alternatives, gluten-free swaps or low-sugar versions for even more versatility.
Ingredient Breakdown
Here’s a detailed look at each key ingredient and why it matters for this dessert:
- Boxed brownie mix (or your favorite homemade brownie batter) – Provides the chewy, chocolate-rich base. Starting with a boxed mix keeps this an easy dinner for beginners, while making from scratch gives you more control.
- Egg(s), vegetable oil and water (or the equivalents listed on your mix) – These are the standard components that help create the right batter consistency, moisture and bake structure.
- 10 Oreo cookies (crushed into fine crumbs) – These create the “dirt” layer on top of the brownies: crunchy texture, cookie flavor and that earthy look for your candy pumpkins. Bonus: Oreo crumbs are budget friendly groceries and super easy to handle.
- 12–16 candy pumpkins (e.g., Brach’s Mellowcreme) – These bright orange candies give the “pumpkin patch” visual effect and make this dessert uniquely festive. They’re the fun center of the theme.
- Green frosting (store-bought or homemade) – Used to pipe swirling vines and leaves around the pumpkins. The green color and piping effect transform the brownies into a charming fall scene.
- Optional piping bag with a small round tip – For those who want clean, decorative results, a piping bag helps you elevate the look from casual to professional.
Each of these ingredients works together: the brownie gives you the fudgy base, the cookie crumbs add texture and visual contrast, the candy pumpkins bring bright color and fun, and the green frosting allows you to create a decorative touch. Together they realize the cheesy comfort food (well, sweet comfort food) concept with a visually impressive finish that still keeps things approachable.

Pro Tips for Best Results
- Healthy cooking tips: If you’re aiming to lighten things up a bit, consider using a reduced-fat brownie mix or swapping vegetable oil for a light olive oil alternative. Still rich chocolate flavor, fewer guilt-inducing calories.
- Easy meal prep hacks: Bake the brownies ahead of time and wait until fully cool before topping with Oreo crumbs and candy pumpkins. That way you can slice and serve when guests arrive without rush.
- Best kitchen tricks for home cooks: To get clean, even piping of vines, chill the green frosting for about 10 minutes so it holds shape better. Use a piping bag with a small round tip for controlled swirls.
- Let the brownies cool completely before spreading crumbs and frosting. If they’re too warm, crumbs may sink and frosting may melt—meaning your pumpkin patch look will be less crisp.
- When placing the candy pumpkins, gently press them into the top of each square after the crumb layer but before piping the vines. That helps them stay secure and look like they’re “planted.”
Ingredient Swaps or Variations
Want to customize this recipe? Here are some fun options that align with gluten-free recipes, low-carb dinner ideas, and healthy recipe alternatives:
- Gluten-free version: Use a gluten-free brownie mix or make your own with gluten-free flour. Swap the Oreos for gluten-free sandwich cookies. You still get the same striking visual effect and decadent taste.
- Low-sugar or keto-friendly swap: Use a low-sugar/stevia sweetened brownie mix (or homemade with almond flour and sugar alcohol) and choose sugar-free candy pumpkins or dark chocolate mini pumpkins. The look remains intact but the sugar count drops.
- Vegetarian/vegan option: Use a vegan brownie mix (or vegan homemade recipe) and vegan candy pumpkins (many brands exist). For green frosting, use a dairy-free buttercream or coconut-milk based option.
- Flavor variation: Add a teaspoon of espresso powder or chili powder to the brownie batter for a mocha or spicy kick. Or sprinkle salted caramel bits between the brownie and the cookies layer for a salted caramel pumpkin patch.
- Seasonal swap: For a spring twist, trade candy pumpkins for candy carrots or mini eggs, pipe orange frosting (instead of green vines) and create a “garden patch” variation. The fun decoration lets you adapt for Easter, harvest time, or any celebration.
Serving Suggestions
To make the most of this dessert and pair it for maximum enjoyment:
- Best side dishes: Serve with a scoop of vanilla ice cream or a dollop of whipped cream to balance the chocolate richness. For hot events, consider mini dessert cups with one brownie square plus a spoon of caramel or raspberry sauce.
- Easy party food ideas: Place these squares on a dessert platter, and let each guest pick a slice with its own pumpkin and vine design. They’re perfect for fall gatherings, kid’s parties, Halloween get-togethers, or potlucks.
- Healthy meal pairings: If you’re serving a sweet treat post-dinner, follow with a fresh fruit platter or a light herbal tea to cleanse the palate. That keeps the overall meal balanced.
- Presentation tip: Use a 9×9” pan and cut into 16 squares so each piece features at least one candy pumpkin and decorative vines. Arrange in neat rows on a board for visual impact.
- Time-saving party trick: Pre-slice the brownies while they’re still in the pan (after full cooling and topping) then transfer to a serving tray with a spatula. Place the tray near a beverage station so guests can help themselves while you relax.
Make Ahead + Storage Tips
Meal prep ideas: These brownies are ideal for baking ahead. Once fully cooled, cover the pan tightly with plastic wrap or transfer to an airtight container. They’ll stay fresh for 2-3 days at room temperature. For longer storage, freeze for later.
Best freezer meals: Wrap individual squares in foil or freezer wrap and store in a freezer-safe bag. Frozen, they’ll keep up to 2 months. To enjoy, thaw in the fridge then bring to room temperature or warm briefly in a 300°F (150°C) oven for 5 minutes to refresh the texture.
Leftover recipe hacks: When you’ve got leftover squares, cut them into smaller “bite” pieces and serve as mini dessert bites with coffee or tea. You can also crumble extras over vanilla yogurt or ice cream for a quick sweet twist.
Busy families love this: The brownies can be baked earlier in the day, topped when convenient, and served later. That makes them an excellent healthy lunch prep addition (slice and pack for after-school snacks) or a ready-to-go dessert when unexpected guests arrive.
Cultural or Historical Notes
The concept of “patch” desserts—such as a pumpkin patch or carrot patch—takes the familiar comfort of a classic treat like Brownie and elevates it into a themed presentation. Brownies themselves originate from the late 19th-century United States and have since become a globally loved dessert bar.
By layering cookie “dirt,” candy pumpkins, and green frosting vines, this recipe borrows from festive fall and Halloween aesthetics—making it more than just a dessert, but a decorative centerpiece connecting tradition (brownies) with celebration (pumpkin patch imagery). It’s a modern take on family-friendly seasonal baking.
Frequently Asked Questions (FAQ)
Can I make this recipe ahead of time?
Yes! You can bake the brownies ahead, let them cool completely, then cover and refrigerate or freeze. Add the Oreo crumbs, candy pumpkins and frostings just before serving, or decorate early and cover carefully.
What’s the best way to store leftovers?
Store in an airtight container at room temperature for up to 2–3 days. For longer storage, freeze the sliced squares wrapped in foil or freezer bags—up to 2 months. Thaw in the fridge or warm slightly to refresh texture.
Can I make this recipe healthier?
Absolutely. Use a low-sugar or whole-grain brownie base, choose lower-fat frostings or natural sweeteners, and swap candy pumpkins for dark-chocolate pumpkins to reduce sugar and increase value. These adjustments make it fit within healthy cooking at home without losing fun.
What substitutions can I use for allergies or dietary preferences?
For gluten-free: Use gluten-free brownie mix and gluten-free sandwich cookies instead of Oreos. For vegan: Choose a vegan brownie recipe or mix and swap in plant-based butter/frosting, vegan candy pumpkins. For low-carb/keto: Use almond-flour or coconut-flour brownies, sugar-free frosting and sugar-free candy pumpkins. These are all excellent healthy substitutions for broader dietary needs.
How do I ensure the “patch” effect looks neat?
Let your brownies cool fully before topping. After spreading Oreo crumbs, gently press candy pumpkins into place. Chill your frosting briefly so it holds shape when piping vines. Use a piping bag with a fine tip and steady pressure for clean lines. Doing this gives the dessert a decorative edge without being overly complicated.
Pumpkin Patch Brownies
Ingredients
Equipment
Method
- Prepare and bake brownies according to package or recipe instructions in a 9×9-inch pan. Let cool completely.
- Place Oreo cookies in a zip-top bag and crush into fine crumbs to create the ‘dirt’ topping.
- Spread the crushed Oreos evenly over the cooled brownies to make the ‘patch’.
- Gently press candy pumpkins into the top, spacing them across the surface like a pumpkin patch.
- Use green frosting to pipe curly vines and leaves around the pumpkins for decoration.
- Cut into squares, making sure each piece has a pumpkin and some vine decoration.


